It was a nice, sunny, late summer day for planting avocado trees! There were many details that I considered during this phase of the project and I would like to share them with you so that you can do your project the right way and avoid any possible mistakes. Firstly, take a look at my planting site map:
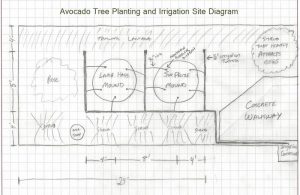
Planting Site & Irrigation Map
The right side of this map corresponds to North, the bottom is East and so on. You can see now that I really do not have a lot of room to work with here! The trees are planted in 8 foot by 5 foot plots. This is very small considering that normal commercial orchard spacing has Hass avocado trees planted in 20×20 foot plots. But this is not a commercial orchard–it’s a backyard orchard, and the whole point is to squeeze your trees into the space you have and keep them pruned!
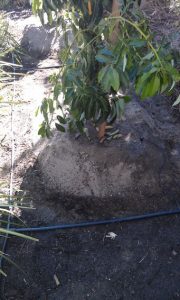
Lamb Hass Mound
Sir Prize Mound
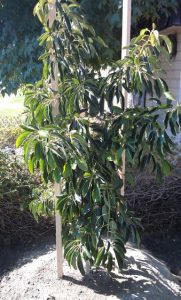
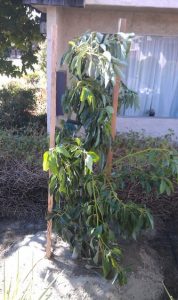
These pictures are taken from the east side of the planting (the bottom of the map). There are three very ideal aspects to this location. One, the next door building to the west, which you see in the background of these pictures, acts as a natural wind break. This will be very important during the flowering season, as it gets windy in March. Two, the area receives sun from morning until at least 3-4pm until it is blocked by the huge Maple tree to the south of the building. Three, there is an existing shrub on the north end of the map which flowers in early spring and gets covered with honey bees, and I am hoping that this coincides with the flowering period of the trees and helps to cross-pollinate them! I couldn’t wish for a better spot really.
In order to prep the area I had to rip out the shrubbery that was there and I dug up about 2 feet of the soil to pull out all the roots and large rocks. I built a home made soil sifter to do this using 1/4 galvanized wire fencing stapled to a wood frame which I placed over a large Rubbermaid container. I ended up digging up some huge monster roots from what must have been a tree that existed on this site years and years ago. It’s important to clear your area of large obstructions like this so that your roots have free space to expand over the years.
The first thing you’ll notice is that I have planted my trees on mounds of dirt that are about 1.5 feet high. I first dug holes that were about 3 feet deep and then filled them in with more of my native soil from another part of my yard to build up the mounds. The reason you want to use mounds is to make sure you never have drainage problems, to allow the roots to breathe, and finally to elevate the trees a few feet so that low hanging fruit don’t touch the ground. You don’t absolutely have to plant in a mound, but it certainly helps, especially if your soil doesn’t drain well.
I lucked out in that I have sandy soil that drains very well. This is the ideal soil type for avocado trees. They like lots of water but they do not like soggy roots. If they sit in water they will definitely rot. I did NOT mix in any soil amendments such as compost! It’s very important that you don’t do this either. Compost will break down over time and cause your soil level to sink. Plant your trees in your native soil! NOTE: The exception to this rule is if you have clay soil. Clay soil is extremely rich and fertile, however it doesn’t drain well. My friend who I went with to pick up my trees unfortunately has this kind of soil. Clay soil is hard as a rock when dry but it turns into mud when it’s wet. If this sounds like your soil, here is what my friend did. He mixed his native soil in a 50/50 ratio with sharp sand. He just happened to have a giant volleyball pitch of sharp sand in his backyard which he acquired from a preschool that mistakenly purchased the wrong kind of sand for their playground (this kind of sand causes irritation to the children who play in it)–what a deal!
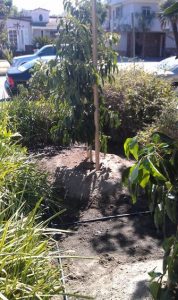
Once I had mounds that were 1.5 feet high by 4 feet wide, I then dug holes in them as deep as the 15 gallon containers the trees came in and twice as wide. By the way, if you acquire your tree from one of the growers down in Fallbrook, the “soil” it comes in will most likely be made of Decomposed Granite. They use this to ensure good drainage. DG is HEAVY! You will never be able to lift the tree out of the container and set it down in the hole. So here’s what I did. Using a utility knife, I cut a slit through the bottom of the plastic container dividing it in half and came up an inch on each side. I then set the tree in the hole making sure it was at the proper level. I then continued the cut on each side of the plastic container all the way up the top completely severing it into two pieces. I was able to tip the tree slightly to one side and pull each half of the container out from the hole. I then filled in the hole about a third of the way and watered it with a hose turned on low. I poked the hose down into the dirt to get the water down in there and make sure there were no air pockets. I did this twice more until it was all filled in, making sure to form a slight basin around the tree to help direct the water down into the roots.
As you saw in the diagram I have chosen to water my trees using a drip irrigation system. My primary reason for choosing this was, well, these trees need lots of water and they need it on a regular basis and you absolutely need to use an automated system to do it properly! You can use a sprinkler system or a drip system to deliver the water, but a drip system has less water loss due to evaporation.
Lamb Hass Mound and Irrigation
Each tree has 5 emitter lines terminating in an adjustable drip emitter:
Sir Prize Mound and Irrigation
I purchased these DIG Corp brand drip emitters at Home Depot. The packaging says they are adjustable from 0-10 gallons per hour at 25 PSI, but I’ve discovered this is completely inaccurate. It’s more like 0, then 8, then 12, then 16 GPH or something like that. I’ve never actually bothered to measure anything higher than the first notch because at this point with the age of my trees, I only need 8 GPH from each of my 5 emitters. This makes for 40 GPH per tree and that works for now. As the trees get older, I can increase them.
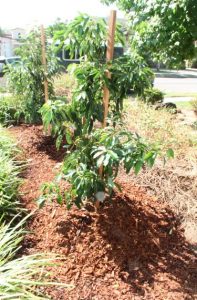
Finished Trees Covered with Mulch
Right now I’ve only got the drip irrigation timer setup and connected to the distribution tubing. Very soon I plan to augment the system with a fertilizer injector. I’m still researching that and trying to figure out what my needs are going to be for the foreseeable future. A future post will contain more details regarding my irrigation setup.